Saturday, April 24, 2010

Installing an Intel X25-M SSD in a 15-inch Macbook Pro 2010

After a long voyage from Shanghai, including stops in Anchorage, Newark, and Baltimore, my 2010 15-inch Macbook Pro has arrived! After reading rave reviews about Intel's line of solid state drives, I opted to buy an 80GB Intel X25M SSD and upgrade the drive myself rather than go with one of the potentially 2.5 times slower Samsung SSD offered by Apple. Installation was a breeze, the only thing I needed was a T6 Torx screwdriver and a #00 Phillips screwdriver. Here are the steps I took to install the new drive.

Here's the Macbook Pro cosy in its box.

... And we're out of the box.

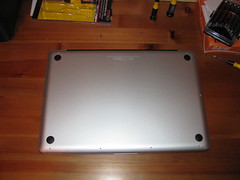
Open the laptop by unscrewing the ten Phillips #00 screws on the underside of the laptop.

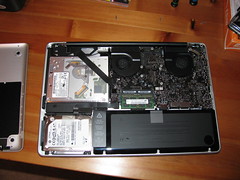
Once they are off, the hard drive is easily accessible.

You will need to remove two more screws and a plastic barrier to take out the Hitachi drive. Be careful shimmying the drive out of its slot, the SATA connector doesn't look like it can handle much abuse.

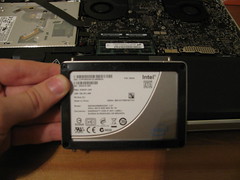
Now remove the support screws from the Hitachi drive using a T6 Torx screwdriver and put them in the SSD.

Connect the SSD to the SATA port, and screw back in the plastic support piece.

Close her up...

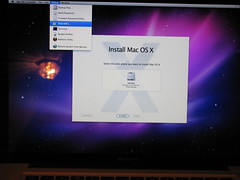
Now you are ready to install OS X! When the computer boots up with the OS X installation CD, the installer won't recognize the SSD because it isn't formatted. To format the drive, go to the Utilities -> Disk Utilities menu, and format the drive using Mac OS X File System (Journaled). Now the installer should detect the drive and let you install OS X.

If you are like me and buy an external enclosure for the Hitachi drive that comes with the Macbook Pro, make sure you buy an enclosure with an SATA connector, not an IDE connector. Sadface. Looks like I'll have to wait another few days for Amazon to ship me a new enclosure.

Saturday, April 17, 2010

Wireless Sleep/Wakeup Issue Resolved for EeePC running Ubuntu 9.10

After upgrading from ubuntu 9.04 to 9.10 a few months ago on my EeePC, I started having issues with my wireless connection. Specifically, when the EeePC would go to sleep, the wireless card would not turn back on when the computer woke up. Moreover, while running:


$ sudo modprobe -r ath9k
$ sudo modprobe ath9k


seemed to turn the wireless card back on, the card was unable to see any networks, and gave a "Device not ready" error in the Gnome toolbar. My solution for the past few months has been to not let the EeePC fall asleep. But today, I finally got fed up with the issue and found a more robust fix. After reading this bug report, I discovered I could get wireless working after the EeePC woke up by running the following commands:


$ sudo modprobe -r ath9k
$ rfkill block wifi
$ rfkill unblock wifi
$ sudo modprobe ath9k


Hooray! To avoid running this series of commands every time the computer woke up, I added them to the EeePC wifi toggle script, "/etc/acpi/eeepc/eeepc-wifi-toggle.sh" in the "radio_on" function. For me this was around line ~59. The final result looked something like this:


...
function radio_on {
echo 1 > $RADIO_CONTROL
sleep 1
# HACK
rfkill block wifi
rfkill unblock wifi
# END HACK
get_wifi_driver
/sbin/modprobe $WIFI_DRIVER 2>/dev/null
...


with my changes between the # HACK / # END HACK comments.

Now wifi starts up and connects to a wireless network when the EeePC wakes up like a champ!

Note: The eeepc-wifi-toggle.sh script is called from /etc/pm/sleep.d/00-eeepc-wifi. The sleep.d directory is where Ubuntu puts scripts that are run when the computer falls asleep and wakes up.

Tuesday, December 15, 2009

Savon HTTPS Client Certificate Authentication


Rubiii's Savon library has convinced me that performing SOAP requests from Ruby doesn't have to be painful. The only thing I needed that the Savon library did not provide was SSL client certificate authentication and server certificate validation. Fortunately, the Ruby Net/HTTPS library makes that rather easy, so I forked Rubiii's repository and added these two features on my own. As of Savon version 0.6.7, these changes were incorporated into the master Savon repository.


Using client certificate authentication / server certificate validation in Savon 0.6.7+ looks like:


client = Savon::Client.new "http://example.com/UserService?wsdl", :ssl => {
:client_cert => OpenSSL::X509::Certificate.new(File.read("client_cert.pem")),
:client_key => OpenSSL::PKey::RSA.new(File.read("client_key.pem"), "password if one exists"),
:ca_file => "cacert.pem",
:verify => OpenSSL::SSL::VERIFY_PEER
}


Then just use the client to call your SOAP service normally:


response = client.get_all_users


If this constructor syntax incorporating the various SSL parameters looks familiar, it is because I borrowed it from Adam Wiggin's Rest-Client.

Thursday, June 18, 2009

Unobtrusive Unobtrusive JavaScript

In the past few months, I have become quite the fan of unobtrusive JavaScript. Not that it took very much convincing - I just didn’t know any better before becoming a follower. Having exactly zero JavaScript calls in my HTML files is very pleasing indeed.

One problem with unobtrusive JavaScript however: very large JavaScript files. In fact, my original approach to using unobtrusive JavaScript was to have one big .js file for all of the pages in my application. As you can imagine, this single JavaScript file grew very large very quickly, and it became apparent that I should break this file up into smaller files.

Ideally, I wanted one static JavaScript file per Rails view. To accomplish this, a coworker of mine mustered up the following method in the ApplicationHelper that would automatically include a particular JavaScript file specific to the controller and action you are visiting:


module ApplicationHelper
def link_default_javascript
path = "#{@controller.controller_name}/#{@controller.action_name}"
if FileTest.exists?("#{RAILS_ROOT}/public/javascripts/#{path}.js")
return javascript_include_tag(path)
end
end
end


This link_default_javascript method is meant to be referenced from a layout file as follows:

Example: app/views/layouts/main.html.erb

<html>
<head>
<title>Rails App!</title>
<%= javascript_include_tag :defaults %>
<%= link_default_javascript %>
<%= yield :extra_javascripts %>
</head>
<body> <%=yield %> </body>

</html>


Note how the link_default_javascript call happens after the javascript_include_tag :defaults call - this is necessary if you reference any Prototype methods in your custom JavaScript files. I’ll get to the yield :extra_javascripts shortly.

Calling the link_default_javascript method in our layout file means if we visit the Rails application's main controller and index action, the layout will automatically load a JavaScript file located at public/javascripts/main/index.js, or do nothing if it cannot find the .js file.

To further this example, our app/views/main/index.html.erb may look like this:


<input type=”submit” value=”Click me!” id=”click_me_button” />


And the public/javascripts/main/index.js file may look something like this:


init = function() {
Event.observe($(‘click_me_button),’click’, function(event) {
alert(“You clicked the button!”);
}
}

Event.observe(window, ‘load’, init);


Thus, if our main controller’s index action uses the main.html.erb layout and renders its default view, app/views/main/index.html.erb, we can expect the public/javascripts/main/index.js JavaScript file to be loaded by default when the page loads. As a result, we should see a popup window appear when we click the "Click me!" button.

Clean, simple and straightforward.

Back to the yield :extra_javascripts call in the layout: this is a popular way to include additional JavaScript files in a specific page without any complex logic in your layout. Say we had a JavaScript file public/javascripts/shared/common.js that we wanted to load on a few views, but not all. In those views, we could add the following bit of code:


<% content_for :extra_javascripts do %>
<%= javascript_include_tag "shared/common" %>
<% end %>


Anything put inside the content_for block will be inserted in the <head> tag in place of the yield :extra_javascripts call. In this case, a javascript_include_tag that includes the common.js file will be inserted into the page's header.

Hopefully you all will find these two techniques useful!

Rails Trickery

Greetings, and welcome to my blog. I plan on using this blog as a platform to present tips, tricks and tutorials geared toward the Ruby and Rails communities. In particular, my goal is to provide a collection of anecdotes and code samples from my daily musings as a Rails software developer. While writing software can be frustrating at times, it is the small day to day victories that keep us all coming back for more. These unpretentious moments are what I wish to focus on.